
Ikea Hack: Snack Station Tutorial


I’m an enthusiast for Montessori practical life activities because they don’t require advanced planning and it simplifies my busy life. Examples of practical life activities include putting away laundry, watering plants, taking care of pets, cleaning spills, arranging flowers, and my absolute favorite, food preparation.
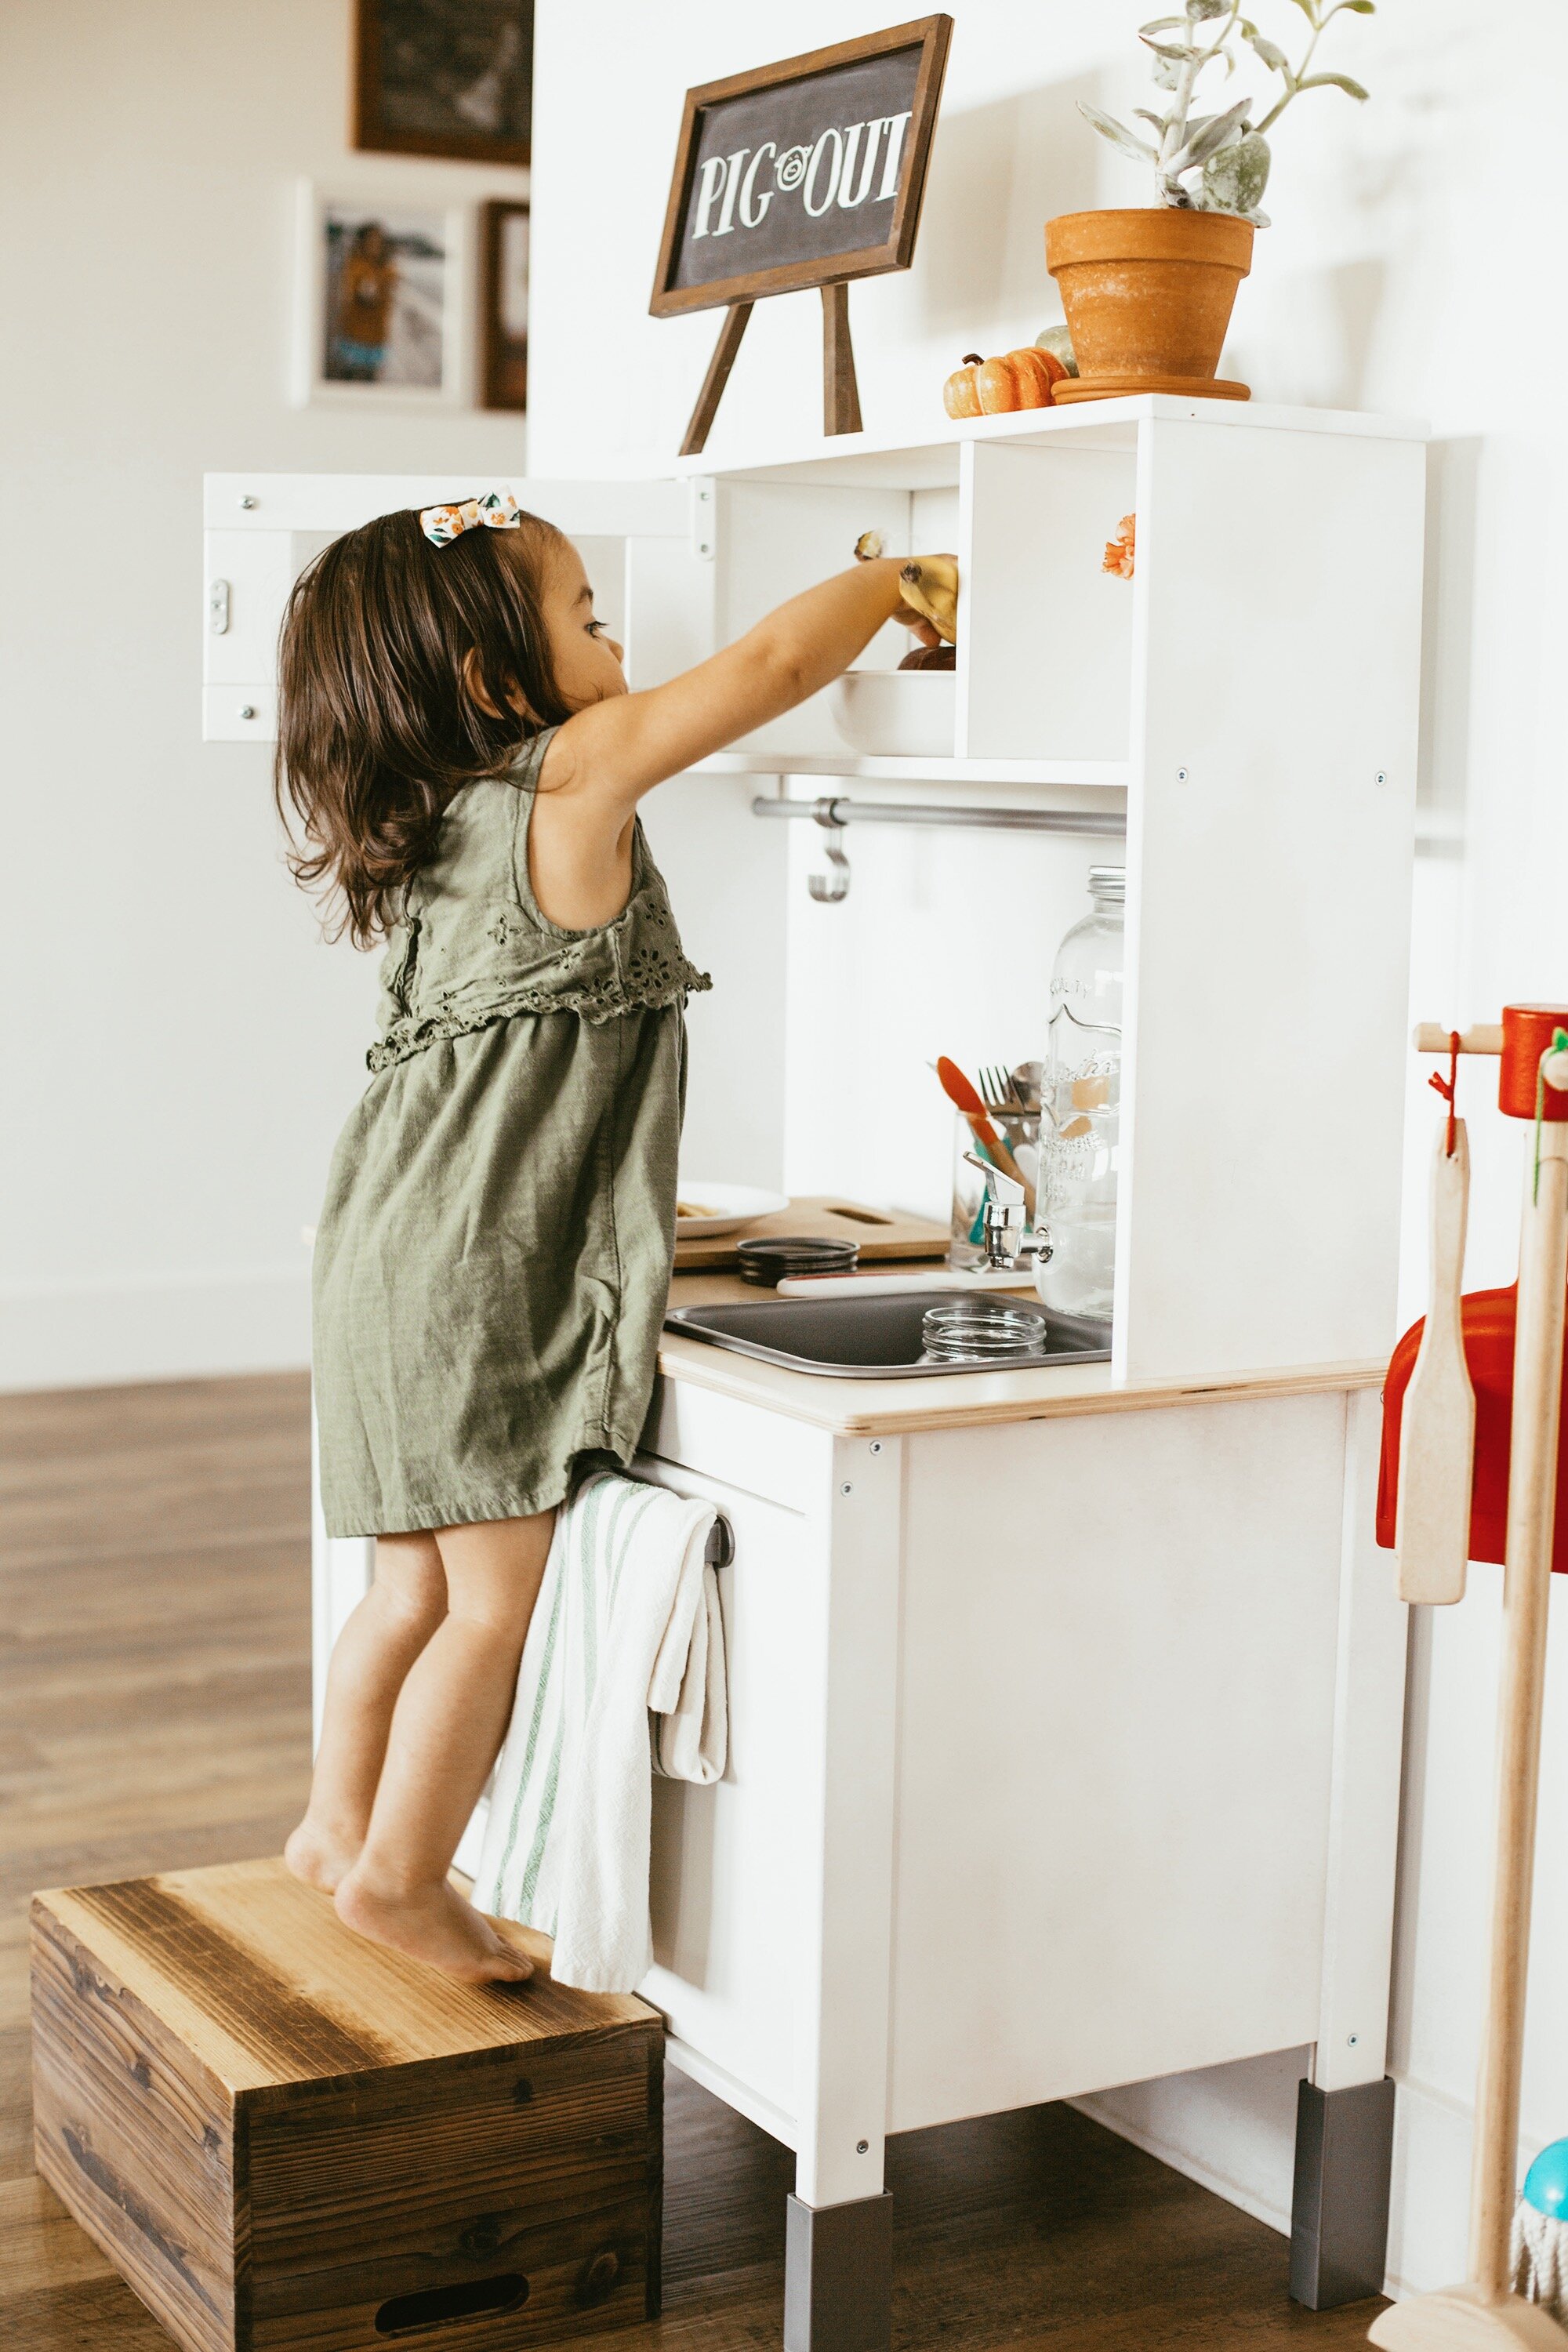
I’m always in the kitchen and I invite Dakota to be involved with the cooking process whenever she wants. I don’t always have the time or patience to slow the process down though. She’s also at the age where she wants to do everything by herself, so I wanted to foster her independence by creating a little kitchen of her own.
Luckily, my friends bought Dakota an Ikea Duktig play kitchen for her first birthday, and I finally mustered the energy to assemble it a couple of months ago. To give you some perspective on just how long the package was collecting dust in our spare bedroom, she’s turning two in October (where has the time gone?!).
Instead of using it as a pretend kitchen, I transformed it into a Montessori-inspired snack station. This kitchen is the real deal and completely stocked with child-sized materials within Dakota’s reach.
When Dr. Maria Montessori opened her first school in 1907, she introduced traditional toys and dolls in the classroom. She discovered that children gravitated towards the “real thing”, such as watching a worm crawl in the garden instead of listening during story time. In another example, children preferred preparing real food instead of playing in a pretend kitchen.
Her observations sparked the development of practical life activities, a fundamental part of the Montessori method. She removed traditional toys from the classroom and kept only those based in reality.
I want to note that while there is a time and place for pretend play, children under the age of six or seven have an exceedingly concrete understanding of the world at this age. They learn the most effectively with tangible experiences from what they can see, touch, smell, and feel.
Now that you have a better understanding behind the purpose of a snack station, you can create your own mini kitchen with confidence.

Let’s Start Building!
Disclaimer: This post contains affiliate links and I receive a small commission (at no extra cost to you) from any sales made through such links. Thank you for supporting the work of this blog!
Materials:
Optional: 600ml white spray paint (I used two 300ml containers of titanium white, non-toxic, and water-based spray paint from Spray Planet)
Instructions:
This step is optional. If you’re painting the kitchen, start by spray painting all of the natural birch pieces in white, but leave the countertop piece as is. Let the pieces dry for at least six hours or overnight.
Assemble the play set according to the instruction manual, but do not assemble the faucet.
Note: Perhaps you’ve seen the extravagant Duktig hacks floating around on Pinterest. You know, the ones with faux marble countertops, pretty backsplashes, and gold accents. I’d be lying if I said I didn’t try to attempt exactly what I just described.
Let me save you the trouble and tell you that the photos look good for social media, but that’s it. In terms of functionality, you’re better off sticking with the original thing. You can add a backsplash if you want, but I recommend leaving the countertop and sink unaltered.
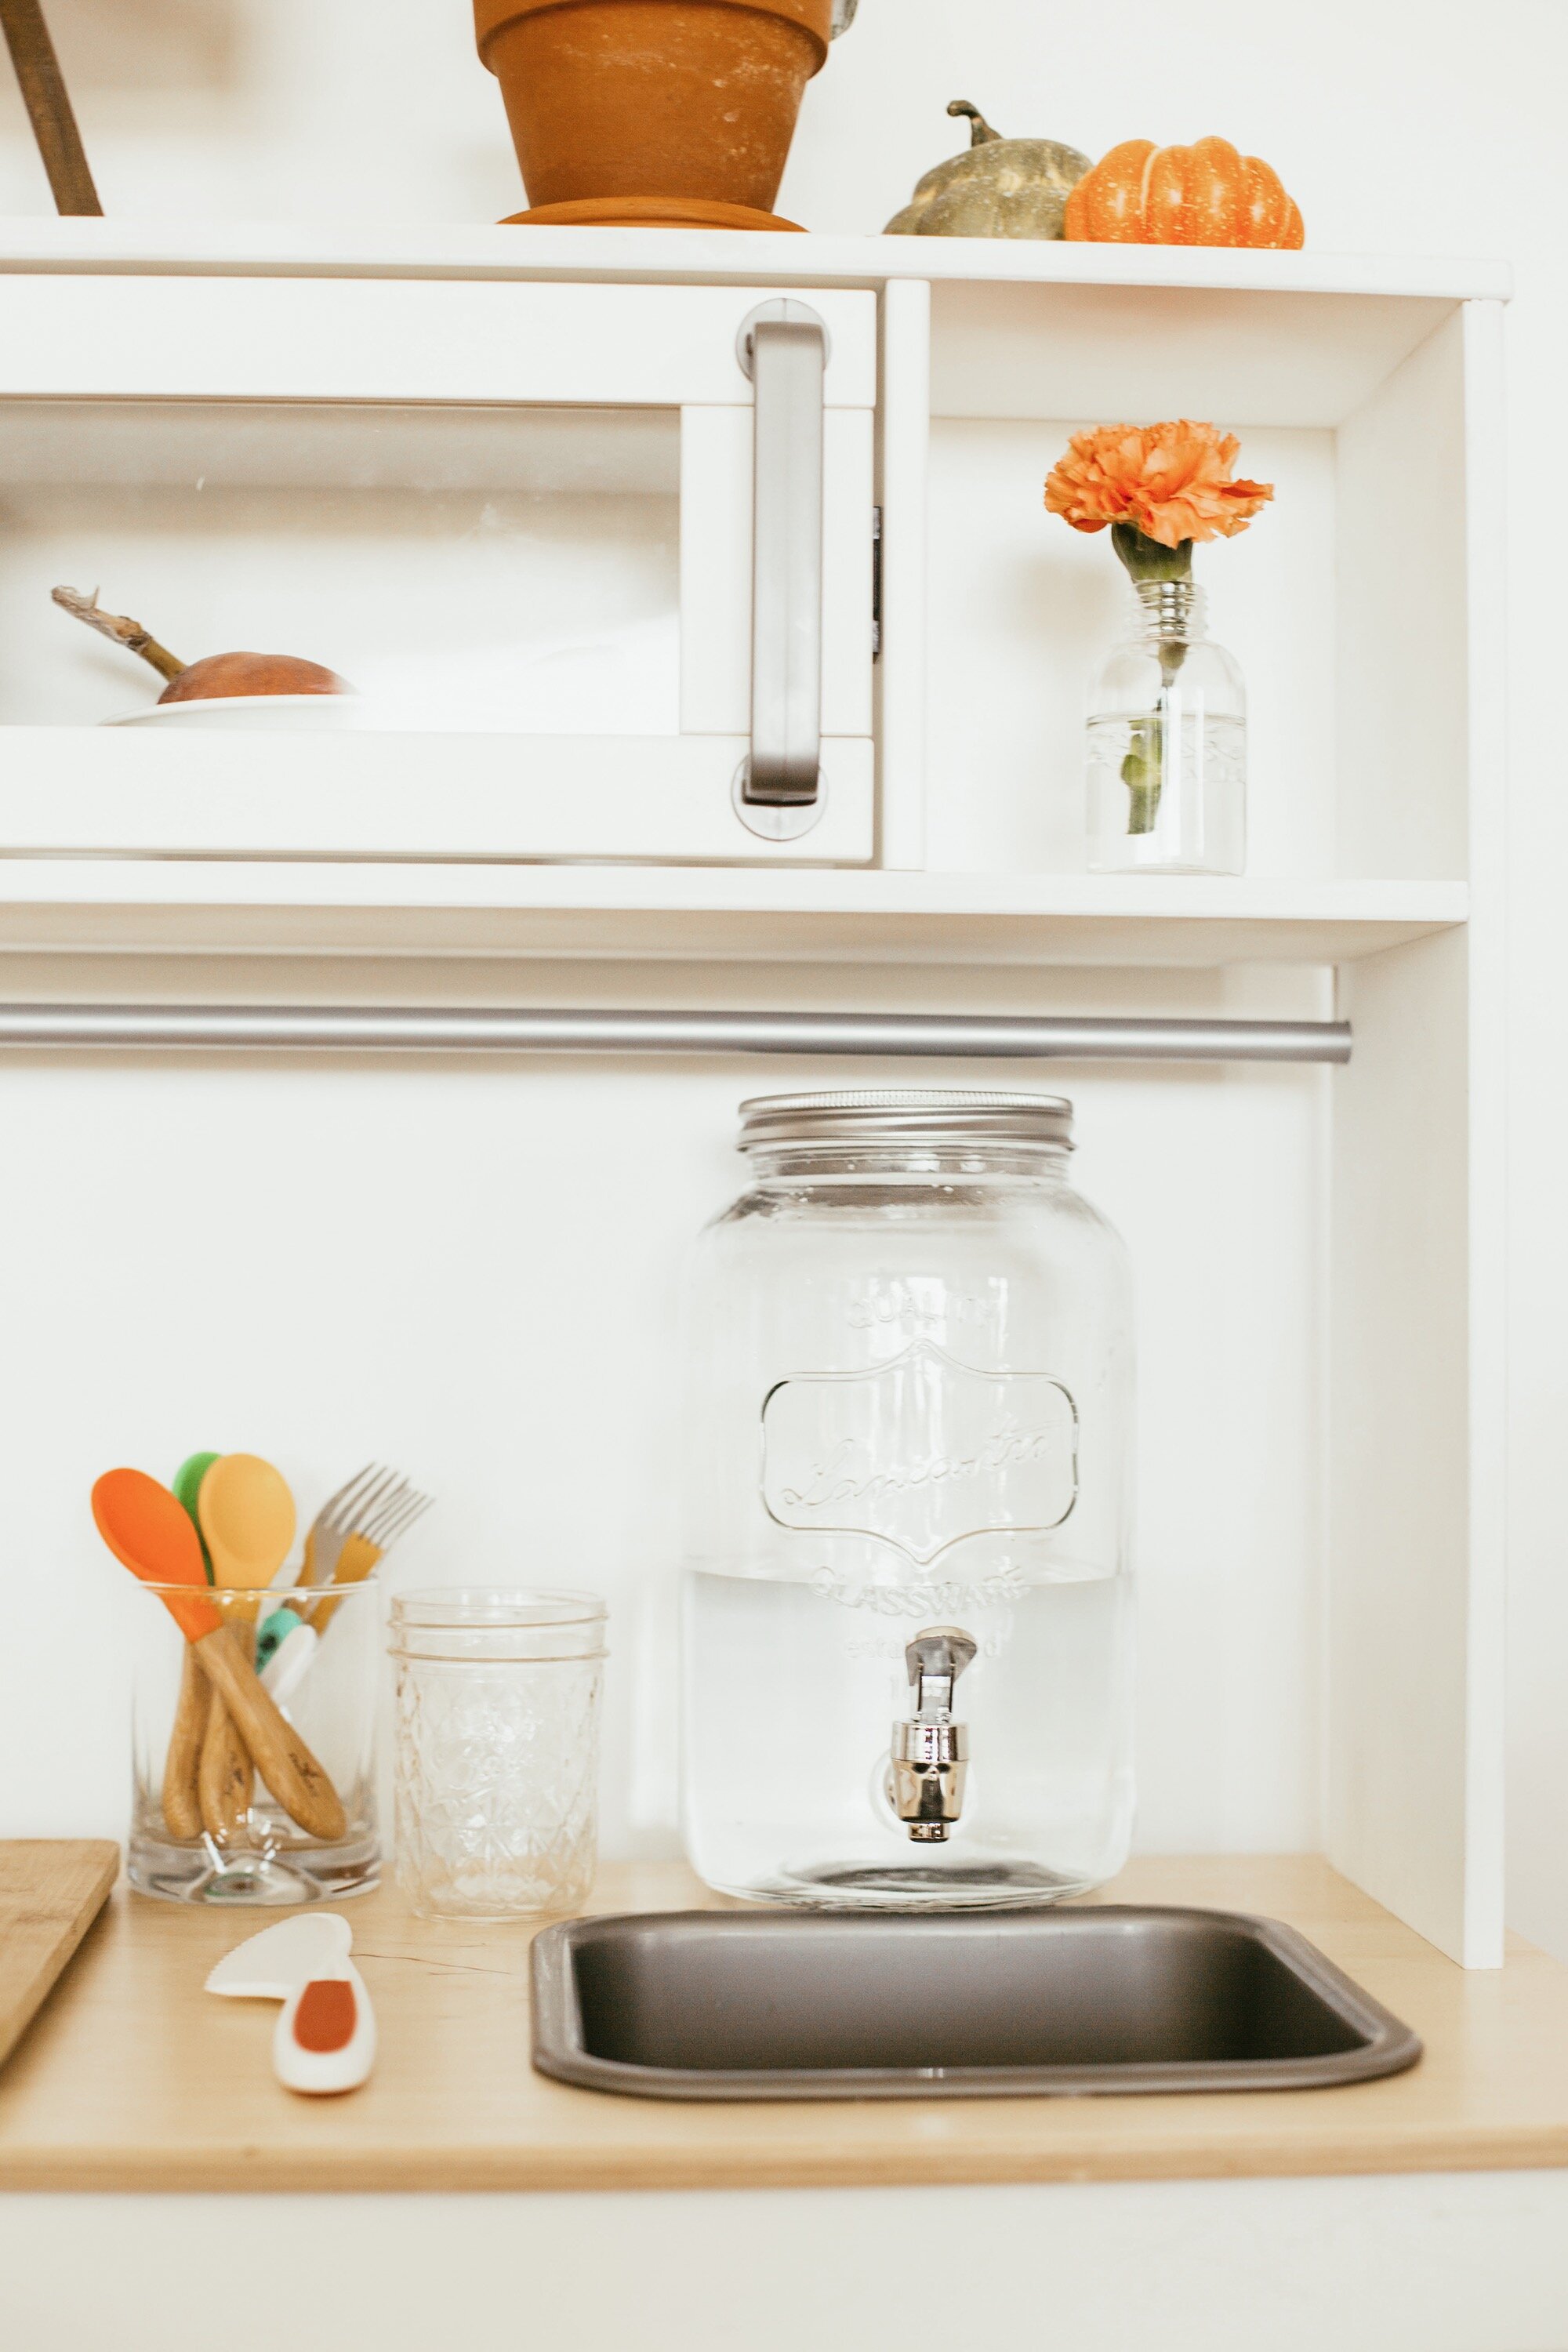
Stock It Up
Dakota’s kitchen is supplied with these materials:
Water dispenser (I recommend filling it about 1/3 full because young toddlers are most likely going to overfill the sink at first)
Utensils
Cutting board
Dishware (plates, bowls, and cups)
Napkins
Microfiber towels for spills
Housekeeping set (broom, mop, and duster for easy clean-up)
Step stool (the play kitchen is intended children over three years old, so Dakota isn’t tall enough to reach the top)
You might be alarmed to see that her kitchen is stocked with glass. Dakota has been using glass since infancy and this is because the Montessori method encourages using real silverware, dinnerware, and glass cups instead of plastic.
When children use plastic, there’s really no consequence when they drop it or throw it on the floor. With glass, you’re giving them the opportunity to experience cause and effect. The cause is the glass dropping and the effect is the glass breaking.
Introducing glass at an early age teaches children how to care for fragile items and helps them establish controlled-movement skills, which are very beneficial for brain development. I know it can be scary and intimidating to give glass to an infant or toddler, but there is a safe way to implement this practice in your home.
To learn more, check out The Kavanaugh Report or Reaching For Montessori who both have wonderful articles on the use of glass weaning cups.


Snacks to keep on hand:
Unsweetened banana/plantain chips (current favorite!)
Dried/fresh seasonal fruit (dates, raisins, bananas, peaches)
Crackers (I alternate between healthy brands including Simple Mills, Mary’s Gone Crackers, and Flackers)
Bread slices
Nuts/nut butters
Snacks to stock right before your child wakes up from a nap:
Tofu cubes
Sandwiches
Veggies & hummus
Fruits from the fridge (berries, grapes, melons, etc.)
Fresh baked goods (like these blueberry quinoa muffins)


If you try this tutorial, I’d love if you tagged me on Instagram @steffywaldrum so I can see your creation!
I also have a “Snack Station” highlight only my Instagram where you can see our kitchen in action. I’ll be posting more snack ideas in the future, so follow along if you’re looking for inspiration!